

Video editing has always been a blend of technical precision and creative storytelling. In the past, editors relied solely on manual work—scrubbing through footage frame by frame, adjusting audio levels by ear, and masking backgrounds pixel by pixel.
Now, AI video editing tools have transformed that process. Instead of replacing the editor's creativity, they act as a smart assistant, automating the most time-consuming parts so you can focus on shaping your story.
This guide walks through how to edit videos in one such AI video editor by Movavi. Learn how to make AI work alongside your own creative input.
Understanding AI in Video Editing
What does "AI" mean exactly in this context? In editing software, AI features rely on machine learning models trained to detect patterns in video and audio. For example, background removal tools analyze frames to identify the subject and separate it from the surroundings, while motion tracking follows a selected object's path through the video.
AI systems can save lots of hours... But they aren't perfect. A human content creator still has to review the results and make adjustments. Think of it less as a replacement for manual editing and more as an assistant that can handle the bulk of technical work so you keep thinking about new creative decisions.
How to Edit Videos with AI in Movavi Video Editor
Step 1: Import and organize footage
The editing process starts the same way it always has: getting your clips into the timeline. In the video editor by Movavi, you can drag and drop files directly or use the Import panel. This is also the point where you should think about organization. Label your clips, sort them into folders, etc.
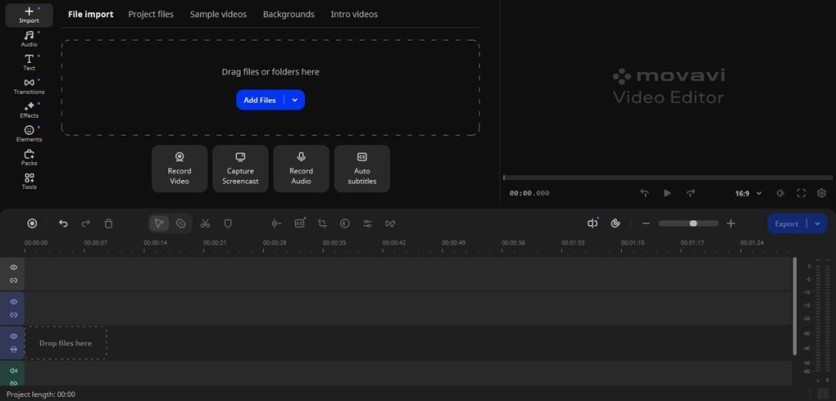
Even though AI will help you later, messy timelines make decision-making harder. AI background removal, for example, will run faster and cleaner on neatly trimmed clips than on uncut, hour-long raw files.
Step 2: Build the rough cut
You can definitely start applying AI power right now. But the advice is to establish the skeleton of your project first. Cut away unusable parts, arrange clips in the right order, and focus on pacing.
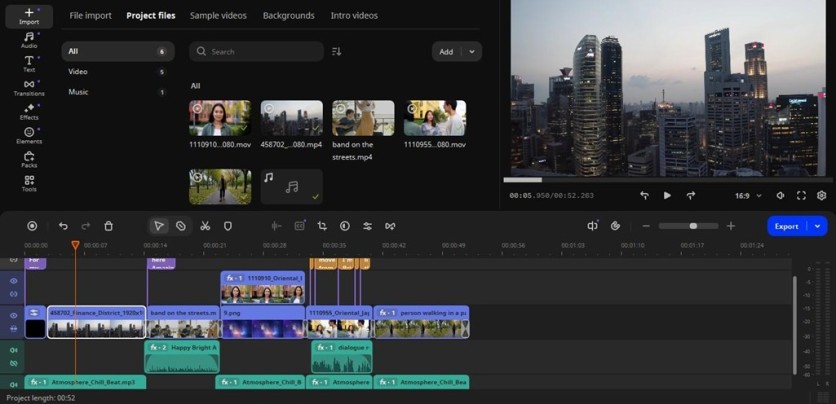
Movavi's timeline works like most non-linear editors, with 3 separate colored layers for titles, video, and audio. So, standard trimming and regrouping still form the backbone of your workflow.
At this stage, don't worry about polishing. Leave transitions rough and audio unbalanced. AI features are most effective when applied to footage that's already roughly in place.
Step 3: Clean up the audio with silence and noise removal
Once your rough cut is in place, address audio quality. Clear sound is as important as sharp visuals. Go into Tools > Audio > Noise removal and click the Artificial intelligence option. It automatically detects and reduces consistent background sounds. Things like hums or any unwanted pauses can easily get depleted in one click by Silence removal.
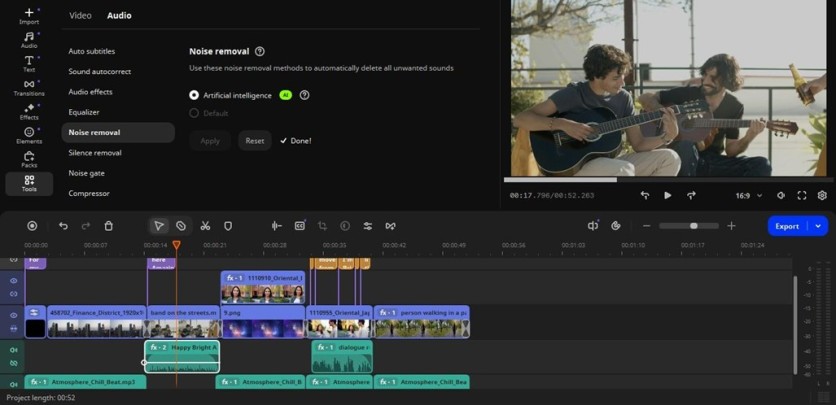
While the tools speed up the cleanup, it's best to apply them selectively. Use them on interview tracks, voiceovers, or essential dialogue, but always listen back after processing. AI can sometimes overcorrect, making voices sound slightly artificial, abrupt, or muffled.
Step 4: Enhance visuals with background removal
One of the most widely used AI video editor features is background removal. In Movavi Video Editor, you can isolate the subject and replace the backdrop with your own image or some color without a physical green screen. You can find it in the same Tools section, but in the Video part.
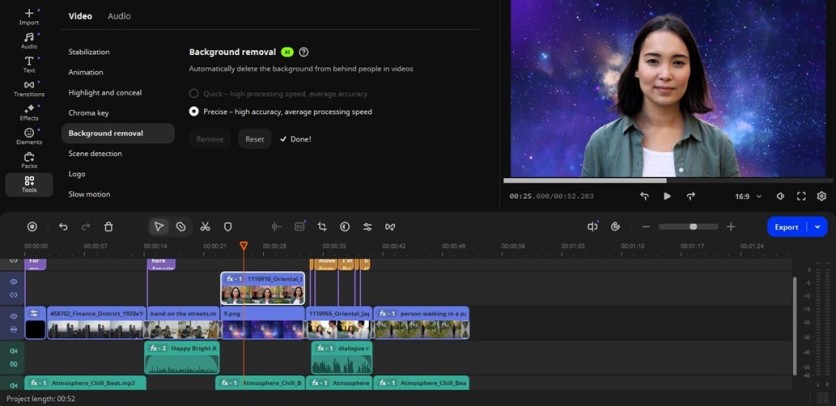
This feature works for any type of content. It's especially useful for interviews filmed in cluttered environments, product demos, or social media videos where you want a clean, branded background.
However, AI background removal is not infallible. Complex settings, fast movement, or overlapping objects can cause imperfect edges or a complete disaster. When that happens, adjust the mask manually, tweak the cutout, and ensure the background replacement looks intentional rather than distracting.
Step 5: Use motion tracking for dynamic effects
Adding graphics, text, or effects that follow moving objects gives your video a polished, professional feel. AI motion tracking here analyzes a clip to follow a chosen object frame by frame. You can then attach labels, arrows, or even blurs to keep them moving naturally with the subject.
The feature can be found under the Video > Highlight and conceal > Motion tracking. You first have to place the object you want to track above the video on the timeline.
Motion tracking is perfect for tutorials, sports highlights, or any footage where you want to draw attention to a moving element.
Step 6: Make your video accessible with auto subtitles
No-sound clip watching is common nowadays. Not only because it's convenient in public settings or when you don't have headphones handy. It makes the content more accessible.
And here comes both text visibility and language.
The latest version of Movavi Video Editor provides auto subtitles in 13+ languages that automatically transcribe speech in your videos. Click Audio > Auto subtitles, choose the desired language or leave it on auto detection, and hit Generate.
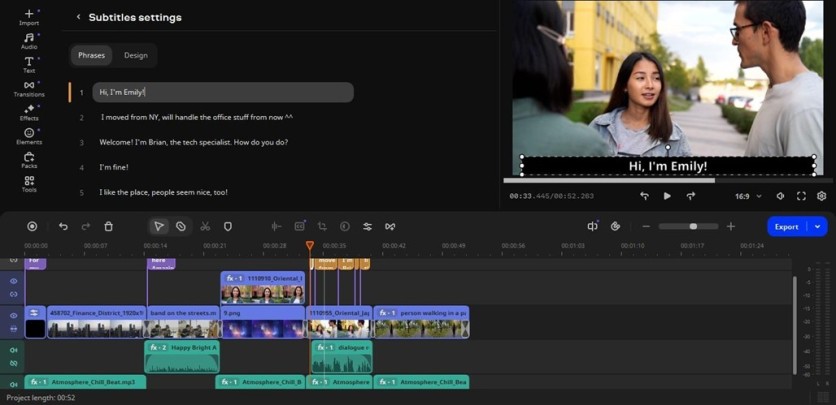
Background noise, accents, and fast speech can still cause errors, but overall quality is decent. You can style captions to match your video's tone and adjust their placement afterward.
Step 7: Apply transitions, effects, and color adjustments
The technical cleanup is complete; it's time to shift focus to creative enhancements. Add transitions to smooth scene changes, apply filters to establish a visual mood, upload a music track, etc.
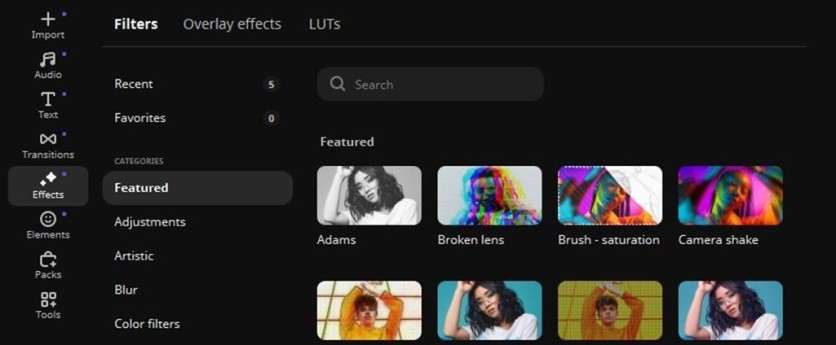
AI isn't heavily involved here, but the earlier steps give you a cleaner starting point, making manual adjustments more efficient. Movavi Video Editor also includes automated color tools (that work as templates for a specific technique), but it's worth taking a hands-on approach to ensure maximum precision.
Step 8: Review and refine
The review stage remains essential. Mostly because AI video editing still has lots of inconsistencies. Watch your edit from start to finish without interruptions. A good workflow is to watch a couple of times separately for visuals, audio, titles, and finish it, focusing solely on pacing.
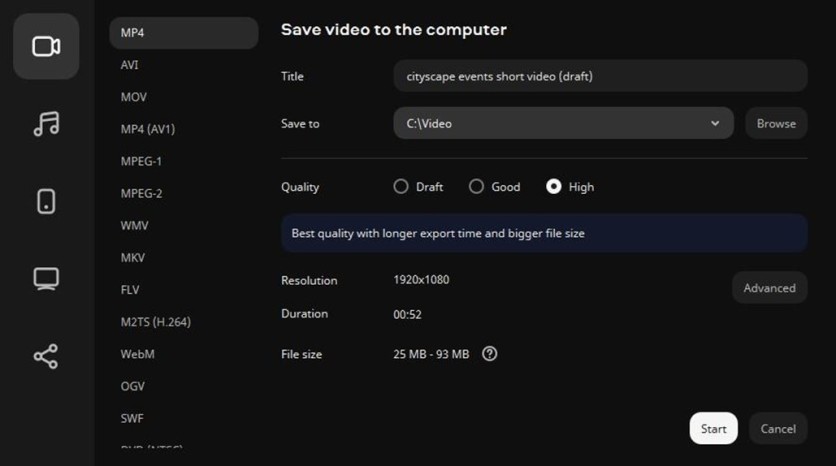
Step 9: Export the finished project
The export settings let you choose resolution, frame rate, codec, and quality. For social media, smaller file sizes and MP4 format are common; for archiving or high-quality playback, use higher bitrates. Choose options that balance quality with compatibility.
When AI Editing May Not Be the Right Tool
AI shines at speed and automation, but it's not built for every job. In stylized or artistic projects, it can "correct" the very flaws that give a video its charm. Precision work (like frame-by-frame animation or complex masking) still demands human hands.
And while AI can trim and arrange clips, it can't sense dramatic timing or emotional pauses the way an editor can. Sometimes, the smartest move is to switch off the automation and trust your own judgment.
Final Thoughts
Editing video in an AI video editor blends automation with hands-on decision-making. The AI features are best seen as tools in a broader editing workflow, not shortcuts to avoid editing entirely.
By starting with a solid rough cut, applying AI where it genuinely adds value, and refining manually, you can produce videos faster while keeping full creative control.
ⓒ 2026 TECHTIMES.com All rights reserved. Do not reproduce without permission.


